CaTer Documentation
Version 1.2
Installation
Setting up the C64
The C64 needs to be connected to the host system via a null modem cable. The construction manuals for an user port RS 232 adapter you can find in the hardware section of the CaTer homepage. The supported baud rates are given below.
| Baud | Frame | Handshake |
|---|---|---|
| 300 | 8 N 1 | none |
| 1200 | 8 N 1 | none |
| 2400 | 8 N 2 *) | none |
| 9600 | 8 N 1 | RTS/CTS |
*) The sender has to use two stop bits, while CaTer still uses one stop bit. By experience, this is accepted by a Linux host. The longer stop bit helps to overcome the timing issues in the kernal RS 232 routines.
You can start CaTer either by loading it from floppy disk with the BASIC loader or directly from an EPROM cartridge. To configure CaTer without recompiling it, the basic loader knows some pokes to set some colours and the initial baud rate and floppy device number. They are documented there.
Setting up the Linux host
Setting up the terminal type 'cater'
To inform programs
about cater's terminal capabilities, the terminfo database has to be
updated. It may be updated system wide or for particular users only. If
you perform the following steps as root, the new terminal type will be
available for all users, else, it is available for yourself only. To
install the cater terminal type get the file terminfo
provided with CaTer and type the command tic terminfo. That's
it.
Some (older) programs prefer the termcap database instead of
terminfo. For those programs you can copy the termcap file to
~/.termcap, which makes the entry available for yourself
only, or you append it to /etc/termcap, which makes it
available system wide.
Setting up the locale
Nowadays, there are usually only
utf-8 locales installed. Do display characters apart from ASCII correctly,
a locale for ISO-8859-15 should be installed. They usually contain “@euro“
in their name. To install, e. g., de_DE@euro, uncomment
the corresponding line in /etc/locale.gen and then run
locale-gen as root to compile the locale.
Login on serial line
To get a login prompt on the
serial line you have to start a getty process, which is done either by
systemd (present Linux distributions) or by init
(older distributions).
The setup of systemd described here is based on the
documentation at ↥0pointer.de.
At first, rename the file serial-getty@ttyC64.service shipped
with cater so that the substring “ttyC64” matches the actual serial port
you use, e. g. “ttyS1”. Then perform the following steps as root with
the substitution of “ttyC64” as done above.
    # cp "serial-getty@ttyC64.service" /etc/systemd/system/
    # ln -s "/etc/systemd/system/serial-getty@ttyC64.service" /etc/systemd/system/getty.target.wants/
    # systemctl daemon-reload
    # systemctl start "serial-getty@ttyC64.service"
To setup a serial login with init, append the
following line to the file /etc/inittab.
c64:23:respawn:/sbin/getty -hL ttyS0 9600 cater
Afterwards you have to activate the new setting with
init q.
As the serial line normally has a size of 0 columns and 0 rows, we
have to change these values. Otherwise some programs like ls
or lynx with SLang become confused. Hence, the shell script
profile.cater.sh should be called/inserted either in
~/.profile or /etc/profile
To run a shell directly on a serial line, first set the parameters with
stty -F /dev/ttyS0 cols 40 rows 25 9600 crtscts -parenb cs8 -cstopb
Then start the shell with
TERM=cater bash </dev/ttyS0 >/dev/ttyS0 2>&1 &
Setting up foreign hosts
If you connect to a foreign host via ssh, it knows the dimension of your
screen, i. e. the width and the height, and the terminal type. To
make the terminal type cater valid, you have to install the
terminfo and, for old fashioned programs, the termcap database. As you
normally are not root on those systems, install it for yourself only as
described above.
As far as I know, there is no possibility to compile a locale for a single user. Thus, one has to hope that the foreign host has installed an ISO-8859-15 locale already. By the way, an ISO-8859-1 is a good replacement. There are only few differences — the most important is the missing of the € sign.
Keyboard
Some keys got a new meaning, sometimes different from the signs printed on the key. The figure below shows the keyboard with the new meaning of the keys.
  ,---,---,---,---,---,---,---,---,---,---,---,---,---,---,---,---,
  |   | ! | " | # | $ | % | & | ' | ( | ) |   | { | } | | | o |DEL|
  |ESC| 1 | 2 | 3 | 4 | 5 | 6 | 7 | 8 | 9 | 0 | + | - | \ |TAB|BS |
  |---'-,-'-,-'-,-'-,-'-,-'-,-'-,-'-,-'-,-'-,-'-,-'-,-'-,-'-,-'---|
  |CTRL | Q | W | E | R | T | Y | U | I | O | P | ` | _ | ~ | RE- |
  |     |   |   |   |   |   |   |   |   |   |   | @ | * | ^ |STORE|
 ,'--,--',--',--',--',--',--',--',--',--',--',--',--',--',--'----,'
 | o |SH | A | S | D | F | G | H | J | K | L | [ | ] |   |RETURN |
 |^C |LCK|   |   |   |   |   |   |   |   |   | : | ; | = |       |
 |---+---'-,-'-,-'-,-'-,-'-,-'-,-'-,-'-,-'-,-'-,-'-,-'---+---,---|
 |   |     | Z | X | C | V | B | N | M | < | > | ? |     | ^ |<- |
 |C= |SHIFT|   |   |   |   |   |   |   | , | . | / |SHIFT| v | ->|
 '---'-----+---'---'---'---'---'---'---'---'---+---'-----'---'---'
           |                                   |
           |                                   |
           '-----------------------------------'
The o sign means, that the key
has no special meaning but sends a PETSCII code. So in future it may get
some meaning. These keys got a new
meaning in CaTer. The function keys have no function.
Cursor Keys
The cursor movement keys send to the host the strings shown below.
ESC means the ESC character.
| key | string |
|---|---|
| crsr up | ESC [ A |
| crsr down | ESC [ B |
| crsr right | ESC [ C |
| crsr left | ESC [ D |
C= Commands
With C= commands it is possible to influence the behaviour of CaTer. They are given by pressing the C= key and a special character.
C= A, ASCII Code A character can be entered by its ASCII code. The code has to be given in decimal notation with three digits and leading zeros. The number is displayed in the upper right corner of the screen. It does not affect the content of the screen and so is usable with screen orientated programs. If you enter a non digit character or a number larger than 255 the buzzer buzzes and the input is aborted. After any input of a ASCII code, no matter if successfully or not, the number stays on the screen for one second.
C= C, Config Menu A config menu appears to set the baud rate, the floppy device number, and the parameters for communication over the serial IEC bus.
C= H, Help Print a short help message.
C= F, Floppy Command With a yellow cursor the user is prompted for a floppy command. The command string entered is sent to the floppy and afterwards the error channel is read.
C= E, Loacl Echo Mode Enters or exits the local echo mode. In this mode every typed char is also displayed locally.
C= D, Dump Mode Enters or exits the dump mode. In the dump mode every char is printed to screen — if it is printable — followed by the ASCII code in hex notation.
C= L, List Directory The directory of the floppy disk is printed to screen.
C= R, Receive file via XMODEM To use this function, you should fist start the XMODEM sender on the remote host. Then you press C= R to start caters XMODEM receiver. With a yellow cursor you are asked for a file name. The file becomes opened and the error channel is read. After the transmission the file on the floppy disc becomes closed and the error channel is read. See also the XMODEM description
C= S, Send file via XMODEM With a yellow prompt the user is asked for the file to send. The named file becomes opened, the error channel is read and cater turns to normal terminal mode again waiting for the receiver to request the file. If you type C= S again, the send mode becomes aborted and the file on floppy is closed. But normally, you would instead start the XMODEM receiver on the remote machine, and the transfer begins. After the transmission, the file on the floppy disc becomes closed and the error channel is read. See also the XMODEM description
C= Q, Quit Quit CaTer. This works only if CaTer is not a cartridge but loaded to ram. Otherwise, it just performs a reset.
XMODEM Description
During the XMODEM transfer, every correctly transmitted block is quitted with a dot (.). You can abort the transfer at any time with RUN/STOP or ^C. The successful end of the transmission is indicated by *. All indicator characters that may occur during the transfer are listed below.
| Indicator | Sender | Receiver |
|---|---|---|
| . | Successful transmitted block. | Successful transmitted block. |
| * | Successful end of transmission. | Successful end of transmission. |
| ?* | Like *, but Receiver did not answer ACK. | |
| r | Repetition request for sent block (got NAK). | Checksum in this block was wrong. Repetition request (NAK) |
| R | Next block does not appear. Requesting last one again. | |
| H | Error in block header. Waiting for silence, then rerequest block. | |
| C | Cancellation by host. Answering with four CAN. | Cancellation by host. Answering with four CAN. |
| UC | Cancellation by user. | Cancellation by user. |
| TC | Cancellation due to timeout. | Cancellation due to timeout. |
| HHHC | Cancellation due to header errors. |
On the Linux host, the programs sx and rx (in
the package lrzsz in Debian/Ubuntu) may be used as counterpart for the
XMODEM file transfer.
Incoming Chars
The printable ASCII codes from 32 ($20) to 126 ($7e) as well as the additional characters of the ISO-latin-9 character set are printed to the screen. Control characters are processed separately.
When the cursor reaches the rightmost column, the last char on the line is printed, but the cursor does not yet enter the next line. Only if the next character is printed, it appears at the first column of the next line and the cursor is placed right to it. This behaviour is described as “eat_newline_glitch” in terminfo and, amongst others, prevents unnecessary scrolling. Without that feature it is impossible to print in the lower right corner of the screen (or better: the scroll region). Most terminals behave like that and one can observe it with the following command:
while :; do echo -n x; sleep 1; done
Control Characters
The table below shows all control characters interpreted by CaTer. All control characters not mentioned are ignored.
| Name | decimal code |
hex code |
Interpretation |
|---|---|---|---|
BEL |
7 | 07 | Rings a bell |
BS |
8 | 08 | Moves cursor one position left. At left margin, nothing occurs. |
TAB |
9 | 09 | Moves the cursor to the next tab stop. The tabs have a width of 8 characters. So the cursor goes to the positions 9,17,25,33,40 (41 is out of the screen). |
LF |
10 | 0a | Moves the cursor one position down. If the cursor is in the last line of the scroll region, the screen scrolls up. If the cursor is in the last line of the screen and this is not the end of the scroll region, nothing occurs. |
CR |
13 | 0d | Moves the cursor to the left margin of the screen. |
ESC |
27 | 1b | Starts an ESC sequence. |
ISO-Latin-9 Characters
The characters from 160 ($a0) to 255 ($ff) are intended to be interpreted as ISO-latin-9 codes. ↥ISO-latin-9 is the newer derivate from ↥ISO-latin-1 and differs in only a few characters. The main advantage is that it contains the Euro sign "€". As there were only 33 characters left, only a few of the ISO-latin-9 characters are displayed correctly. Well, as I am from Germany, the German umlauts are displayed correctly. Furthermore the French characters should be complete. All other latin letters with "decoration" are displayed bare. Some characters are not implemented at all, they are displayed as square.
Below there is a list of all ISO-latin-9 characters. Black characters are displayed more ore less exactly, but it's not always distinguished between small and capital letters. Magenta letters are displayed without decoration and red letters are displayed as a square.
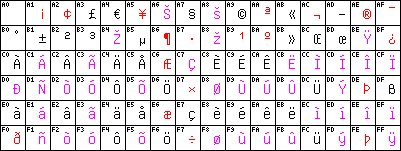
The next picture shows the new character ROM.

ESC Sequences
CaTer is able to recognise ANSI ESC commands. ESC commands are strings like
  ESC x          ESC # x
  ESC ( x        ESC [ ... a
  ESC ) x
where ESC means the ESC character, x
means any character, a means any character in
{a-z,A-Z} and ... means any character string
of the maximum length of 254 bytes.
All these ESC commands are ignored, i. e. they are not displayed. If the command is displayed below, it has a special meaning. The commands are conforming to the ANSI escape sequences and are known from other terminals like VT-100 or Xterm. Some ESC sequences get numerical arguments. These have to be given as a decimal number in ASCII characters. If a number given is larger than 255 it is converted wrong and strange things may happen.
Scrolling Region
ESC [ start ; end r
The region between line “start” an line “end” scrolls up if the cursor hits its bottom. Initially the scrolling region starts at the first screen line, line 1, and ends at the last. The cursor can be positioned outside the scrolling region with the commands CUP and HVP. Lines outside the scrolling region never scroll. After selecting the scrolling region, the cursor moves to the home position, which is always the upper left corner of the screen.
Cursor movement Each of these commands moves the cursor n steps in the mentioned direction. If the cursor hits the right or left screen margins or the scrolling region margins, it stops. If n is zero or left away, a movement of one step is performed.
| Cursor Up (CUU) | ESC [ n A |
| Cursor Down (CUD) | ESC [ n B |
| Cursor Forward (CUF) | ESC [ n C |
| Cursor Backward (CUB) | ESC [ n D |
Cursor Position (CUP)
ESC [ line ; col H
Moves the cursor to the given line and column. The upper left corner is line 1, column 1. If line or column is omitted or equal to zero, it is treated as 1. The HVP command is equal to CUP.
Cursor Position (Home) (CUP)
ESC [ H
This moves the cursor to home position, which is the upper left corner.
Horizontal and Vertical Position (HVP)
ESC [ line ; col f
This means the same as Cursor Position (CUP).
Horizontal and Vertical Position (Home) (HVP)
ESC [ f
This means the same as Cursor Position (Home)(CUP).
Index (IND)
ESC D
Moves cursor down one line in same column. If cursor is at bottom margin of the scrolling region, screen performs a scroll-up.
Reverse Index (RI)
ESC M
Moves cursor up one line in same column. If cursor is at top margin of the scrolling region, screen performs a scroll-down.
Next Line (NEL)
ESC E
Moves cursor to first position on next line. If cursor is at bottom margin of the scrolling region, screen performs a scroll-up.
Save Cursor
ESC 7
Saves cursor position and character attribute. (See restore cursor)
Restore Cursor
ESC 8
Restores previously saved cursor position and character attribute. If none were saved, the cursor moves to home position.
Select Graphic Rendition (SGR)
ESC [ a1; a2; ... ;an m
Selects one or more character attributes. The attributes a1 ... an are divided by a semicolon. If no attribute is given, all attributes are turned off. The attributes have the following meaning:
| number | attribute |
|---|---|
| 0 | Turn off all attributes. |
| 1 | bold |
| 4 | underline |
| 7 | reverse |
Reverse characters are displayed reverse (what a surprise!). The other character attributes are displayed by different colours.
  vanilla (gray3)                  bold (white)
  underline (light blue)           underline bold (cyan)
Additionally the commands to change the foreground and the background colour are supported. If a fore- and/or background colour is given, they override the text attributes given above. The foreground is given as 30 + ANSI#, the background is given as 40 + ANSI#. The colours are displayed like that:
| ANSI # | colour | displayed as | VIC # |
|---|---|---|---|
| 0 | black | black | $00 |
| 1 | red | light red | $0a |
| 2 | green | green | $05 |
| 3 | yellow | yellow | $07 |
| 4 | blue | light blue | $0e |
| 5 | magenta | purple | $04 |
| 6 | cyan | cyan | $03 |
| 7 | white | white | $01 |
If solely a foreground colour is given, it is applied as indicated above. If only a background colour is given, it is displayed as a reverse char in the colour indicated above. If both are given, the capabilities of the VIC are exceeded and the display mode is chosen by the following rule: Display the foreground colour; but if it is black or white and the background colour is not black, display the background colour.
This approach assumes that if the foreground colour is black or white, the significant colour information is the background colour. However, if the background is black, the font becomes hard to read.
Erase In Line (EL)
ESC [ x K
Erases characters in the cursor line. The cursor position is not affected. The meaning of x is shown below. If x is left away it means zero.
| 0 | Erases from cursor to end of line, including cursor position. |
| 1 | Erases from beginning of line to cursor, including cursor position. |
| 2 | Erases complete line. |
Erase In Display (ED)
ESC [ x J
The cursor position is not affected. The meaning of x is shown below. If x is left away it means zero.
| 0 | Erases from cursor to end of screen, including cursor position. |
| 1 | Erases from beginning of screen to cursor, including cursor position. |
| 2 | Erases complete display. |
Hide/Show Cursor (DECTCEM)
  ESC [ ? 25 l	(hide)
  ESC [ ? 25 h	(show)
These sequences are used to switch the cursor on or off.
Bugs
Below there is a list of all the bugs I know. If you find more or — even better — you know the solution for one, write to LSto at gmx dot de.
ANSI ESC sequences If a number in an ANSI ESC sequence is larger than 255 an incorrect number is read.
XMODEM receiver Sometimes the ACK after a correctly received block gets lost. Instead (or before) the ACK an $ff is sent. This seems to be a problem of switching from IEC bus to the 9600 baud interface. The error is caught by the XMODEM protocol by typing R and request the last block again with NAK.
Kernal RS 232 The Kernal RS 232 routines are buggy. They are tuned by new, experimentally found timings for the PAL version and the 2-stop-bit cheat mentioned above. However, this is not perfect. CaTer runs most reliable at 300 and 9600 Baud.